CADIQ 3D PDF Reports
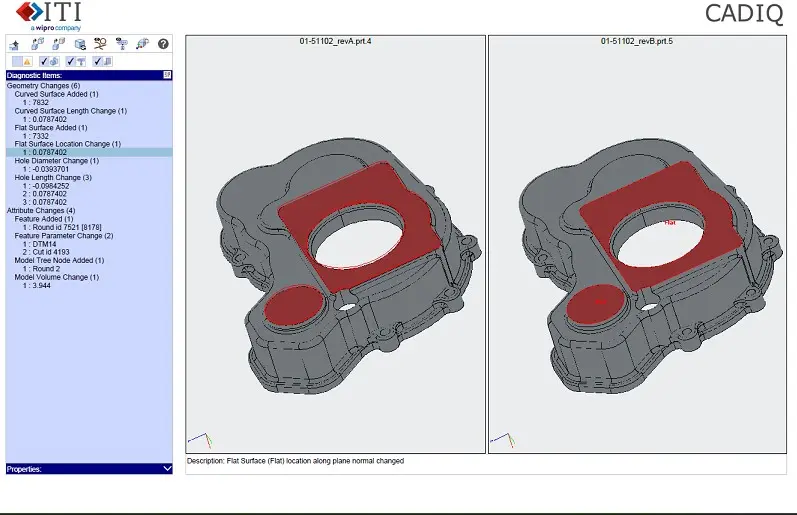
Side-by-side Adobe 3D PDF for Revision Comparison Validation
With 3D PDF, users can enable the distribution of CAD models with diagnostic results and viewing controls. Users who may not understand or even use CADIQ have access to CAD model quality or validation results to access critical validation information. CADIQ results can be published to a 3D PDF for quality validation or side by side for comparison validation.
CADIQ users can automatically generate 3D PDF reports during a CADIQ controller/analysis session or from within the CADIQ Viewer. In addition, CADIQ Viewer users can create custom views that mark up an active session and capture the 3D model, viewpoint, diagnostics, diagnostic markers and comments associated with custom diagnostic views. These custom views are then created within the PDF report.
Opening a CADIQ 3D PDF Report
To open a CADIQ 3D PDF Report, simply double click on the PDF file or start Adobe Reader DC or newer and choose the PDF file using the File -> Open menu.

An example CADIQ 3D PDF Report
Cover Page:

Model Page:

CADIQ 3D PDF Report Mouse/Keyboard Controls
CADIQ 3D PDF Reports are standalone documents that can be controlled by the mouse and keyboard controls provided by the Adobe Reader. Some of these controls include:
- Orbit camera relative to view center:
- Press and hold only the Left Mouse Button while moving the Mouse.
- Pan (translate) camera:
- Press and hold the Control Button and Left Mouse Button together while moving the Mouse.
- Press and hold the Left and Right Mouse Buttons together time while moving the Mouse.
- Zoom camera in/out:
- Press and hold the Shift Button and Left Mouse Button together while moving the Mouse up and down.
- Rotate the Mouse Wheel Forward/Backward.
- Press and hold only the Right Mouse Button while the moving Mouse Up/Down.
- Zoom in on a rectangular area of the screen:
- Press and hold the Control Key and Right Mouse Button together then stretch a rectangular area to zoom in on.
CADIQ 3D PDF Report Cover Page
First page of 3D PDF Report is always cover page. It has following features:
- If there are no HOT diagnostic items and option to export Warm/Error/Info diagnostics is selected and the job does not have those diagnostics, only cover page, with Summary status of ‘PASS’, is created.
- If there are no HOT diagnostic items and option to export Warm/Error/Info diagnostics is selected and the job has those diagnostics, cover page is created with Summary status of ‘PASS’, and 2nd page is created with Warm/Error/Info diagnostics.
- Title is based on IQJT DisplayName 'DisplayName': 'Validate Part PMI Derivative by View'.
- If there are HOT diagnostic items, 2nd page is always created.
- The summary status is 'FAIL' if there are any HOT diagnostics items, it is 'PASS' if there are no HOT diagnostic items.
- If the job is for model comparision, the summary status is 'Changed' if there are any HOT diagnostics items, it is 'Not Changed' if there are no HOT diagnostic items.

- 'Saved View' column lists all saved views present in the model (for PMI with saved views jobs). A row for each saved view with its highest HOT level will be created. 'Count' will list HOT items count in that level.
- If a saved view doesn't have HOT diagnostics items, the Changes/Defects column will have 'Clean' state.
- The Geometry, PMI and Attribute columns shows respective icon if the saved view has diagnostic item(s) of that category present in it. (Green Circle - No hot diagnostic of that category present, RED traingle - Hot diagnositc of that category present)

- Click on 'Saved View' button to view the model on 2nd page. The 2nd page is opened with the selected saved view as active view.
- For Assembly with saved views, only saved views are shown in the summary table. 'Count' column is sum of all HOT diagnostics items of all components parts of that saved view.
- If 'Attach Summary Reports to PDF Report' option is selected, summary reports (text files), xml report is attached to the PDF report. All summary report in text format are combined into a single text file and attached to the PDF report. User can view the attachment from the cover page.


CADIQ 3D PDF Report Toolbar Buttons
Buttons from Left to Right:
- Reset View Center: Reset view center to projection point from mouse position.
- Use Transparent Highlighting On/Off: When enabled, unhighlighted faces display transparent -- useful for viewing CADIQ diagnostic results which document features or defects in the interior of the model.
- Override Native Face Color On/Off: When enabled faces are displayed using an override color rather than native face color, useful when native colors and diagnostic highlight colors result in a confusing display.
- Reset Model View: Resets the graphics windows and PDF fields on the current page to their initial (as opened) state.
- Curves On/Off: Toggle all presentation curves On/Off.
- Annotations On/Off: Toggle all annotations, except current selected annotation(s), On/Off.
- Copy Viewpoint: Use to synchronize the viewpoint from PDF report to CAD system session. Use Ctrl^A then Ctrl^C to copy text to Windows Clipboard, Open CAD system session and click on copy viewpoint.
- Use Ctrl^A then Ctrl^C to copy text to Windows Clipboard, Open CAD system session and click on copy viewpoint.
- Help: Requests URL: CADIQ 3D PDF Reports
- Show Warm Values On/Off: Select/Unselect to show Warm values On/Off. The 'Warm' column will be turned On/Off based on this checkbox selection.
- This checkbox will be un-checked by default when 'Export Warm to Standard PDF Report' option is set.
- Show Error Values On/Off: Select/Unselect to show Error values On/Off.
- This checkbox will be un-checked by default when 'Export Error to Standard PDF Report' option is set.
- Show Information Values On/Off: Select/Unselect to show Information values On/Off.
- This checkbox will be un-checked by default when 'Export Information to Standard PDF Report' option is set.
- Show PMI Diagnostics On/Off: Select/Unselect to show PMI diagnostics On/Off.
- Show Geometry Diagnostics On/Off: Select/Unselect to show Geometry diagnostics On/Off.
- Show Other Diagnostics On/Off: Select/Unselect to show Other diagnostics On/Off.
The diagnostic count in the Saved views panel is changed on the selection/deselection of these buttons.
CADIQ 3D PDF Report Saved Views Panel
Saved views panel disaplys the diagnostics count for each saved view. User can select the required saved view to view its diagnositcs. Active saved view is displayed with background color. On 'Show Warm Values On/Off' selection change, 'Warm' diagnostics and column will be shown/hidden.

PDF report for job without saved views will not display the 'Saved Views' panel.
PDF report for assembly shows 'Parts List' with diagnostic count for each component instance. User select part to view its diagnostics.

CADIQ 3D PDF Report Diagnostic Results
Quality defects and differences between model pairs identified by CADIQ are documented in CADIQ 3D PDF Reports as diagnostic items. Diagnostic items can be displayed and reviewed by interacting with the Diagnostic Item selection box.
- The Diagnostic Items list allows to select diagnostic items identified by a diagnostic.
- The Properties textbox shows properties of selected diagnostic items.
- The Description textbox shows details of selected diagnostic item.
- Properties panel can be expanded/collapsed to view properties of the selected diagnostic
- When a diagnostic is selected, Description field will be visible to show the diagnostic description.

CADIQ 3D PDF Report Annotation/Curve Color
- If white annotations are not visible on the white background of the graphics area, the annotation presentation color can be overridden by setting the environment variable CADIQ_REPORT_OVERRIDE_NATIVE_ANNOTATION_COLOR=1 and re-create the PDF report.
- Preference color for curves can be overridden by setting the environment variable CADIQ_REPORT_OVERRIDE_NATIVE_CURVE_COLOR=1 and re-create the PDF report.
CADIQ 3D PDF Report - Dispositioning
The dispositioning pdf rerport can be generated when diagnostic items are dispositioned using CADIQ Viewer.
- The summary cover page contains 'Disposition By', 'Disposition Date', 'Summary' from user defined dispositioing. Each dispositioned item with its number of selected diagnostics is displayed in the table.
- User can click on the disposition item to navigate and activate it on 2nd page.
- The Geometry, PMI and Attribute columns shows respective icon if the disposition item has diagnostic item(s) of that category present in it. (Green Circle - No hot diagnostic of that category present, RED traingle - Hot diagnositc of that category present)

- 'Disposition Items (ECOs)' lists all the disposition items, clicking on it populates diagnostic items under this disposition item.
- Selecting a disposition item updates Saved Views panel, if applicable, with number of hot/warm items.
- Selecting a disposition item shows its comments in the 'Disposition Item Description' field.
- A diagnostic can be selected to review, similar to Standard PDF report..

CADIQ 3D PDF Report - Custom Views
The custom view pdf report can be used to publish Custom Views created in the CADIQ Viewer to PDF report.
- The summary cover page lists names of the custom views. User can click on the custom view to navigate and activate it on 2nd page.
- The Geometry, PMI and Attribute columns shows respective icon if the custom view has diagnostic item of that category present in it.

- 'Custom Views' lists all the custom views - user defined and automatically generated by CADIQ.
- Selecting a custom view displays it in 3D window and populates all its selected diagnostics.

Adobe Reader Preference Settings
These Adobe Reader preference settings are recommended:
- Disable (uncheck): Documents -> Open tools pane for each document.
- Enable (check): 3D & Multimedia -> Enable playing of 3D content.
- Enable (check): 3D & Multimedia -> Enable view transitions.
- Enable (check): JavaScript -> Enable Acrobat JavaScript.
- Enable (check): JavaScript -> Enable global object security policy.
CURRENT LIMITATIONS (pending Reader/Acrobat enhancements to be delivered by Adobe)
- On an assembly page, individual face color overrides are not supported, so the color of the first face of the top-level entity (solid, shell, unsewn face) is used.
- Interactive markup of CADIQ 3D PDF reports using Adobe Acrobat is not supported.
- Using Adobe Reader 10.0.0, synchronization of the left and right graphics windows is real time. Using Adobe Reader 10.0.1 or newer, synchronization occurs only after releasing the mouse button.
- Due to an intermittent view synchronization initialization problem, the user may lose the ability to manipulate the left graphics window directly. Manipulation of the right graphics window and automatic synchronization of the left graphics window should continue to work.
- Due to an intermittent view synchronization issue, the right graphics window may be slightly tilted relative to the left graphics window after choosing a diagnostic item from the pull-down menus. Choosing the diagnostic item again usually resolves the issue.
- When viewing an assembly report with multiple pages, the pull-down menu text may disappear after switching to a different page. Switching to a different page and back is a known workaround.
- After closing a PDF file in the Adobe Reader, the PDF file cannot be deleted for 5+ seconds and another PDF file cannot be opened for 5+ seconds.